Monday 11 May 2015

UV Mapping - Interceptor

Interceptor

I started by experimenting with an existing texture I had downloaded for the X-wing Thrusters. The result was quite comical...


Interceptor experiment

I realised however that the technique I used earlier on in the blog, which was to reverse the faces of the left wing, meant that the texture had been added on the inside.

I quickly found that within the duplicate special options I could copy using the translate option. I copied a wing over when finally finding the right plane to translate across.


Always the last pane you try 

So here is the result:

Psychedelic Interceptor

Quite cool actually. Anyway now I have downloaded a simple flat steel image.

Simple I know, lets see how it looks with this texture over the entire ship.


That is a good basis to start from I think.

To add new textures to certain faces, firstly you need to assign a new material, and then you can add a new file image to it. In this instance I used the carbon fibre flat image that I found online. 

Using the new planar function as described earier, it fine tunes the direction and scale of the image and makes it look a lot nicer.

Here is the result after simply adding the carbon fibre texture to the face:

Add Carbon Fibre Texture


Here is the result after using the add planar function (reminder: select the face, then within the uv editor use shift and right click - add planar.)


So much better. Here is the result after adding the carbon effect to all wing panels:


Carbon Fibre Wings


It seemed a bit dull so I got a darker metal texture and decided to give all of the turrets and the front hatch a darker detail.

Same process again, add new material, add file etc..

Adding Detail

Select all objects at once to make for a speedier process. Here is the finished result:


After finishing the darker detailing I  realised  that the front hatch clashed a lot with the body, so I got a slightly darker texture to attach to the body.

The first attempt didn't really go to plan:

Maybe Not!


The second texture attempt was better, but still a maybe:

Maybe


A little too ' Russian Spetnaz' for my likings, although it did come in handy for a panel on the rear:

Back Panel
So I decided to add a glass texture to the front and back panels. The way in which I did it was to create a Blinn texture, usually used for a metallic surface, and then altering the properties to shadow the following;

Glass Specification


Back Hatch Glass


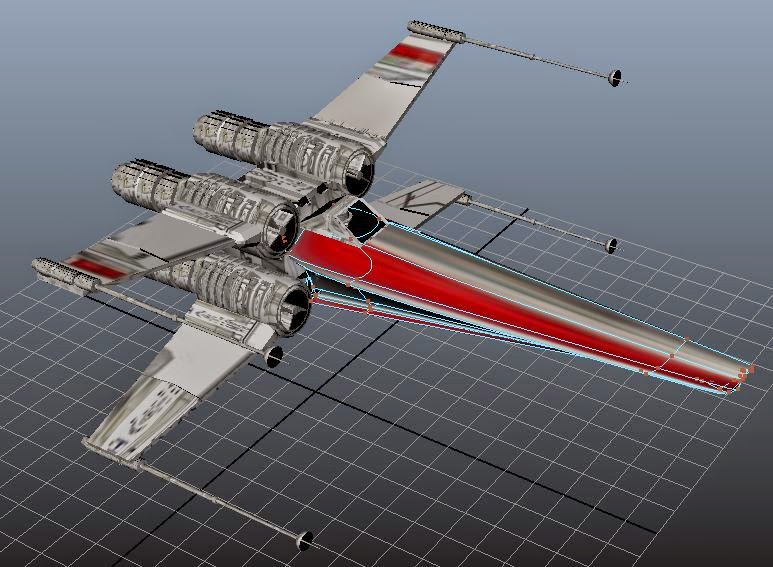
I also added a glass top the front, I think that this will add extra detail to the final animation, in fact it is made so easy for you that I am going to go back to the x-wing and repeat the process.


Front Glass 

Also I will get round to adding some internal detail to the Interceptor...watch this space.


Final Textured Design


Materials - UV Mapping

UV Mapping

UV mapping is a technique that helps add materials and textures to complicated polygon surfaces, giving them a more realistic look.

You can do this by using Maya’s UV Texture Editor (EDIT UVs | TEXTURE EDITOR in the main menu).

The UV Texture Editor gives you very discrete control over how the texture maps to an object.

The UV Texture Editor unfolds the geometry into 2D flat surface and gives you more precise options of applying textures. 

Class Exercise - Cardboard Box

So I start with a simple cube, and an image to be wrapped around it.


Right click material attribute, add file from directory, and choose the image.

Add Image File

Select ok and see the result.


Unwrapped Image


Notice that maya has done a pretty good job at unwrapping the image, although its not perfect, this is where edit UV's texture editor comes in to fine tune the coordinates of the uv mapping.

UV Mapping

Now in order to manipulate the UV mapping, you need to select the UV vertices and move them into appropriate positions. 

Note: The UV vertices will not affect your geometry as they are mapping coordinates Right-click-hold on the UV wireframe and select UV..

Note* you can use the tools from the main window on the texture editor.


UV texture editor, move the texture vertices to match the objects, 


Finished Box With Mapping


 X-Wing

So I found some mapping textures online for the x-wing...

X-Wing - UV Map

Added all the map and then started positioning the nose map.

Positioning the nose map


You can select desired faces/ objects etc. and then go to the UV editor to open the UV map with the selection highlighted as you can see above.

As well as editing the detail with the UV map positioning, I also realised that I had to remove some, 

Remove detail


To remove the detail on the wings I simply selected the faces of the wings and within the UV editor selected areas with lower detail, using move and scale functions.

You can select desired faces/ objects etc. and then go to uv editor to open the UV map with the selection highlighted.

AYou can add extra planes on the UV map by selecting the faces (for example) you require, and then shift-right click - add planar to highlight. 

I was happy with the extra detail on the thrusters:

Thruster Detail
Here is the Final Design, I may come back at a later date but I am quite happy with the look at this point.


Final Design
After just a few hours using the UV texture methods I have created a model that in my opinion looks very similar to the X-wing from the movies.

Maya is a fantastic piece of software that is so user friendly.

One final touch I thought about for when we start to animate the models, lets add some rocket boost effects

Boosters

Ok so I came back, again. After creating glass textures to my Interceptor model, I thought I may as well add some to the X-wing.

So firstly simply add and place the shape.

Add Shape

Then repeat the above settings for the texture added to it.


Front Window


Rear Window