Wednesday 15 July 2015

Final Cut

Final Process

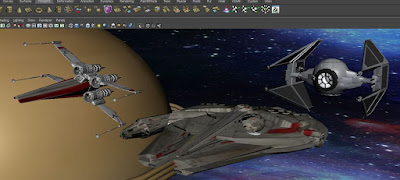
 So to finish off the project all I needed to do was to introduce the millennium falcon to scare away the 'dark side' Interceptors. 
millennium falcon 
 I had a strange issue with the millennium falcon import, it seemed to appear with bright green textures. Not exactly what I wanted. I simply deleted it and re-imported it and then it appeared just as designed.
 Firstly I noted that the X-wing model was badly lighted during the previous animation. An easy fix for this is just to go into the lighting menu and select all lights. I did the same for the planet that I created with its revolving rings as the rings were creating shadows that looked really bad. 

Planet with shadows
Planet without shadows
 So I proceeded to add my millennium falcon, and animate it in accordance to the already existing scene. Whilst animating the scene I found that it is good to keep in mind the exact frame number of the scene you are trying to alter or to save a key frame to, then zoom in on the slider bar to exactly pin point the key frame you require.
Key frame selection
 Make sure that you have the correct object selected before you start editing key frames.
Enter the render settings before batch rendering your scene, you can set to render only a few scenes just in case it isn't as expected, rather than waiting ages to batch render the whole scene and it being wrong!

Final shot
 Another issue I encountered was that after rendering the scene, although on screen there were no mistakes, the scene in after effects showed  the blank part beneath the space 'half dome that I created! So annoying as I tried various techniques to stop this happening but I really didn't want to change all of the camera angle key frames. So I decided to just expand the space back ground image.
 This actually helped out with some cross over errors on the background images.
I will be using Adobe Photoshop and After effects to add titles and music.

Script Check

You can check the script information to see the progress of your render. 


I ran into a problem when rendering my full scene. After waiting a long time for the full scene to render out it was very annoying to discover that it did not play in any player. I decided in the end to render only a few frames at a time (say 50 to 100) so that if I encountered a problem again I knew what part of the scene contained an error, and also I wouldn't have to wait a great amount of time.

My Conclusion to my Maya 2015 experience. Many amazing things I can say about this program.
Interface - The Maya interface is extremely easy to navigate around and with all of the precise selection tools it makes life really easy when trying to create those finer details.
Animation -  the animation interface sets Maya apart from its counterpart 3ds Max. It is so user friendly.
Setting the project - Always remember to set the project directory before really getting your teeth into a project. I made this mistake and saved some textures to a different directory. Maya obviously created a file path to the texture so when trying to move that texture file, it disappeared from the scene. Maya made it incredibly easy for me to find the texture and apply it again, and wrapped it around the object as it was previously without me having to map it again.
After this project I haven't even delved into half of the options and capabilities of Maya.
Here are some of the best new features on Maya 2015:
Maya now supports Multi-Touch viewport navigation on tablets and Apple trackpads. 
Maya 2015 includes significant new Deformer options to alter and animate object shapes. The Texture Deformer delivers fast, interactive, and simple displacement mapping directly in the viewport. To conform the shape of one object to another, use a Shrinkwrap Deformer. For character rigs, Geodesic Voxel binding is a new method to automatically set vertex weights on a Skin Deformer. It’s an advanced algorithm that produces fast, quality results with complex geometry.
Polygon modeling tools show significant development. Updates to several key features such as Reflection Symmetry, Multi-Cut, and Quad Draw help modelers work more intuitively and with greater efficiency. The modelling toolkit is now integrated into the reorganized main menu. Maya’s Booleans enjoy a much-needed upgrade with an entirely new algorithm, resulting in improved reliability.

Subdivision surface modeling just got faster with OpenSubdiv, the new default algorithm. OpenSubdiv is the emerging industry standard for subdivision surfaces, yielding better performance and interoperability among various applications. Maya’s OpenSubdiv implementation only works with the OpenGL graphics driver; there’s currently no DirectX 11 support.

Maya has many new tools for UV layout. Texture artists can now place several Multi-tiled files within a single texture node. In the UV Texture Editor, unselected components are no longer hidden. UV shells can now be easily created from component selections. Edges that share UVs are easier to identify by highlighting in unique colors. A built-in test material helps artists see UV distortion without having to build and assign shaders. Unfold uses the new Unfold3D algorithm, and Optimize gives us a new method to relax crumpled UVs.


In the world of materials and shaders, Maya 2015 adds the ShaderFX editor, enabling game artists to develop real-time shaders. Throughout Maya, improved Color Picker Eyedropper behavior makes it easier to edit materials and textures. The old standby Ramp texture node now has a horizontal gradient with a resizable floating window, making a huge difference for artists who were previously constrained by a tiny Ramp preview.


The release of Maya 2015 sees useful new features for rendering. Viewport 2.0 is now the default viewport renderer. It finally supports most everything in Maya, including dynamic objects such as Particles and Fluids. The Render View now sports Exposure and Gamma slider controls, particularly useful in high dynamic range workflows.


Polygon modeling tools show significant development. Updates to several key features such as Reflection Symmetry, Multi-Cut, and Quad Draw help modelers work more intuitively and with greater efficiency. The modelling toolkit is now integrated into the reorganized main menu. Maya’s Booleans enjoy a much-needed upgrade with an entirely new algorithm, resulting in improved reliability.

Subdivision surface modeling just got faster with OpenSubdiv, the new default algorithm. OpenSubdiv is the emerging industry standard for subdivision surfaces, yielding better performance and interoperability among various applications. Maya’s OpenSubdiv implementation only works with the OpenGL graphics driver; there’s currently no DirectX 11 support.

Maya has many new tools for UV layout. Texture artists can now place several Multi-tiled files within a single texture node. In the UV Texture Editor, unselected components are no longer hidden. UV shells can now be easily created from component selections. Edges that share UVs are easier to identify by highlighting in unique colors. A built-in test material helps artists see UV distortion without having to build and assign shaders. Unfold uses the new Unfold3D algorithm, and Optimize gives us a new method to relax crumpled UVs.


In the world of materials and shaders, Maya 2015 adds the ShaderFX editor, enabling game artists to develop real-time shaders. Throughout Maya, improved Color Picker Eyedropper behavior makes it easier to edit materials and textures. The old standby Ramp texture node now has a horizontal gradient with a re sizable floating window, making a huge difference for artists who were previously constrained by a tiny Ramp preview.


The release of Maya 2015 sees useful new features for rendering. View port 2.0 is now the default view port renderer. It finally supports most everything in Maya, including dynamic objects such as Particles and Fluids. The Render View now sports Exposure and Gamma slider controls, particularly useful in high dynamic range workflows.


Finally, mental ray for Maya benefits from numerous upgrades. Interactive Production Rendering now supports Progressive mode, speeding up the process of lighting and shading shots. Mental ray preview swatches display ray-traced reflections, giving better visual feedback in designing materials. Light emission from Image-Based Lighting is now simpler to use and faster to render. The mila_material is available for layered shaders, and ambient occlusion can be GPU-accelerated. (http://www.lynda.com/articles/coolest-new-features-maya-2015)


Wednesday 24 June 2015

Animating the First Scene

Animation

Maya is one of the fore runners in terms of animation software on the market, this is mainly down to how its animation interface is set up for ease of use.

At the bottom of the screen you can see a time slider, set up in frames per second. Just to the right you can set the time of the end frame, and also you can slide the time slider or expand it to zoom in to fine tune a specific part of the scene.

Time Slider

Within the windows-settings/preferences menu you can change things such as the size of the timeline (I made mine higher so to make it easier to see) and you can change the frame rate of the scene amongst other things


Preferances

Scenes can be created in various ways, but always by adding key frames. To set an original key frame the hot key is to press 's'.

Each model can be selected and given there own key frames. I started off with the x-wing, positioned it at its start point, then hit S to set its original key frame. Notice that a red line will appear on the time slider to represent the key frame. You can then reposition this by holding shift-left click on the red line, and moving it accordingly.

Set Original Keyframe

The first technique to animate the first scene is simply to move the time slider along a set amount of frames, then reposition the model, hit 'S'. Now slide the time slider between the two key frames to see how it looks.


Second keyframe
At this point don't worry about the viewpoints as this will be amended later when adding cameras.

Keep on adding key frames and re positioning the model and hitting S along the time line. A good tip that I found was to make the key frames equally distanced apart so that you can judge the same distance that model should cover between each one.


More Key Frames
I imported four Interceptors in total , as I wanted to have them appear in a normal formation, and then upon spotting the x-wing changing into an attack formation (by using the previous mentioned simple technique).


Normal Formation


Interceptors Rotating

Attack Formation
You notice that I removed (moved out of scene) the hemisphere background so that each individual model could easily be selected and manipulated. Again move the time slider along, then position one by one the models into its new position and hit S to add the key frame.

When you want to add the background again, go to the beginning of the scene, re position the background and add a key frame (S) for the back drop.

If you want to fine tune the movement of the models you can use the Graph editor. Within window - animation editor - graph editor you will find this menu. 


Graph Editor
Whilst in the graph editor, select a model, then hit F. You will see the graph lines appear. These represent the position, scale and rotation of the model. By selecting the black dot at any point and moving it, you can alter its values so that you can achieve a smoother more accurate animation.

Lastly for the first part of the animation I created a long thin tube, added a blinn material and made it bright green to represent a laser shot.  

Slide the time slider to just after the Interceptors finish their formation changes and position the laser just outside of the turret. Hit S whilst the laser object is selected to add a key frame with that laser in position

Use Ctrl D to duplicate the laser multiple times and move them to different turrets. Then again simply slide the time slider along, move the lasers so that they are heading towards the x- wing and keep hitting S. 


Lasers
Attack
I then animated the X-wing to do a corkscrew to avoid the lasers.


Cameras

So now I have ten seconds of animation. Now I will add a camera. Go to menu create-camera-direct camera. Because my environment is so big I scaled up my camera. This does nothing to the cameras view point perspective, it simply makes it easier to see. 

Add Camera
Also rename the camera within the layers menu so that you can select it easier.

Camera layer

So now we have a camera I went back to the start of the frame. I found this to be the best technique, by going to the Panel menu, with the camera selected then hit look through selected objects.

Now that we are looking through the camera we can see exactly what will be recorded for rendering.

Position the camera to a good start point, where we can see the x-wing, and the same as we did with the models, add key frames using S.

Add key frames whilst following the scene along the time line, positioning the camera so to get the best view of the scene at each point.

Experiment with different views and angles. The first attempt is not necessarily the best.

I will move onto more advanced techniques for the next scene, but here are some screenshots of my progress so far.


I started to render the scene, mainly to learn how to but also to put it online. I realised that the lighting was a little off from the position of my three point lighting. As its a space scene I decided to create a sun object that will emit light (that can wait for the next blog).

Whilst rendering I will talk you along some problems that I came across.

First of all, you should analyse the settings to decide, is it a final production or just a test?

The reason I say this is because the render sequence takes a long time, I set my sequence to full settings and rendered the full scene and it took nearly 20 minutes on a quad core processor! For this scene as its only an alpha version I set the lowest settings.

Also make sure that you set the file name and the destination. You should always set the project file within the file menu.

Once that you have rendered your scene, open Adobe After effects and import the first file. This didn't work for a while because Maya renders individual images, not a sequence or video. So make sure that you click the add sequence tick box.

Import Sequence

So with the low quality settings here is the first rendered test scene.


Monday 22 June 2015

Preparing for Animation

Setting up the Scene

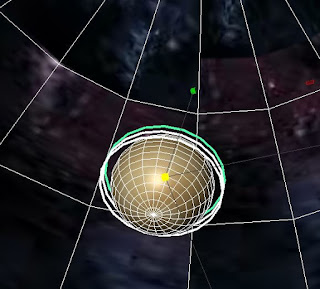
So to start the animation process I first had to create a new project file to be used for the scene. To add a background effect an easy technique to use is to create a hemisphere with a space texture effect, and add the texture to the inside of the half sphere.


Add caption

Again the UV texture editor is handy to properly position and scale the texture.

Then the models need to be imported into the scene (File-Import). Upon importing my X-wing model I encountered an issue when trying to manipulate its angle.


As you can see each part of the ship rotated about there own separate axis, not ideal.

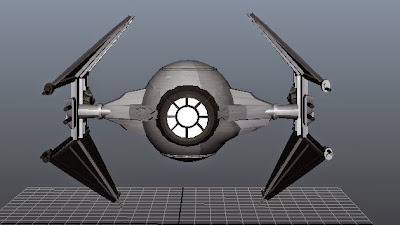
To fix this problem I went into each project file (x-wing, interceptor, millennium falcon) and used the combine tool to make the ships into one object. 


Combine Interceptor


Combine X-wing


Combine Millennium Falcon
I created a sphere and added some saturn style rings just to add some terrain to the space battle.


Planet creation
To easily find my models within such a large work space I created a layer for each and added each individual model to its own space.

Create Layer


Now I have all the elements I need to move to the next stage, setting up the lighting.


Ready for lighting
As previously mentioned a good scene should have appropriate lighting to, I am going to use the 3-pointed lighting effect. Maya makes it easy for you to add many types of cameras. I am going to use 3 'directional' lights.


Add camera
After adding the camera you can select its direction, also you can turn on the shadows effect from the atribute editor.


Lights casting shadows
Make sure that the shadows are turned on within the shading menu.


No shading
With shading
Now the lighting is finished, the next steps will be animating the scene, followed by adding cameras.

Monday 8 June 2015

Cameras and Lighting

Cameras and Lighting

Before I dive into the animation sequence of my Star Wars production, Ill start by having a look at some professional techniques used to create a good looking animation sequence.

Cameras

Camera movement, frame and angle size play a considerable role in how your scene will be portrayed. Effective use of cameras is a good way to add character and feeling to your final cut. 

Camera techniques vary in aspects of camera movement in space, angle of shot and size of frame. 

The range of camera techniques in terms of movement include: 
- Panning Moving left, right freely
- Tilting Pivoting up and down 
- Dollying Moving of camera towards or from an object (not zooming) 
- Tracking Moving left or right but attached on a specific track 
- Cranning Camera free from the ground; attached to a crane or helicopter. Good shots for beginning and end of film. 

The size of frame (size of shot) influences the meaning which an audience will interpret Depends on the distance the camera from the subject and the focal length of the camera lens. In terms of frame size, basic camera techniques are: 

- Close-up - Medium-shot 
- Long shot 
- Point-of-View shot 

In terms of angles the following camera angles are widely used in cinematography: 
- Bird’s eye angle 
- High angle 
- Eye-level angle
- Low angle Each of the above angles is used to give a different feeling to the viewer depending on the scene and scenario. 

Just to give a little more detail about my storyboard, I intend to start off with a Cranning camera effect viewing the X-wing, dollying the camera back and forth to show off certain details of the ship, Following that I will have an eye level angle from the back showing the ships thrusters in action, revealing multiple Interceptors approaching from the distance, Camera then zooms to a close up shot of the impending danger.

I will experiment with different camera angles, sizes etc. whilst the X-wing dog fights with the Dark Side, and try to get the best look. I will blog that as I do it.

Athough I will make use of some close up shots of the Millenium falcon as it appears to help out the X-wing in the fight.

Lighting

The most common technique in lighting is arguably the 3-Point lighting. It consists of three sources (Points) of light which are referred to as: 

- Key light This light is the primary light source of the scene and is the most influential and strongest in terms of intensity. It is placed 0 o and 50 o to the side of the camera & above the camera. 

- Fill Light This is a secondary key that is placed on the opposite side of the subject from the key light. It opens up the shadows of the key light and provides subtle illumination of the subject. It also acts as the indirect illumination. It is placed between 10 o and 60 o to the side of the camera, and up to 15o above the camera.

- Back Light (or Rim light) This light separates the subject from the edge. It is placed between 50 o and 10 o below the camera. Note: As you may have noticed the positioning of the light sources is relative to the camera. Thus, it is the camera that comes first into the scene and then  the lights.


Key Lighting

I intend to model some planets and a sun, so the fill light will always be directed from that angle. I will use the fill and back lights at different intensities during different scenes, its hard to say right now before I do it but I will be sure to blog it along the way.


Wednesday 3 June 2015

UV Mapping - Millenium Falcon

Millennium Falcon Texturing


Original Model

So I start with the model previously created in my blog. I uploaded an image of the ship and wrapped it using the add material function previously noted.

See that I dragged away the glass material for the window so as not to select it by accident, thus keeping the same properties for it. 


Add texture

You can see that Maya didn't fail completely at wrapping the image, although it still was not good enough. The UV mapping editor (within the edit UVs menu) is used to more precisely position your texture by editing the position of each uv point.

Re position UVs
Also select objects and faces to be a different texture and detail the,m accordingly.

Detail


Final Results

Final Results

Final Results

Monday 11 May 2015

UV Mapping - Interceptor

Interceptor

I started by experimenting with an existing texture I had downloaded for the X-wing Thrusters. The result was quite comical...


Interceptor experiment

I realised however that the technique I used earlier on in the blog, which was to reverse the faces of the left wing, meant that the texture had been added on the inside.

I quickly found that within the duplicate special options I could copy using the translate option. I copied a wing over when finally finding the right plane to translate across.


Always the last pane you try 

So here is the result:

Psychedelic Interceptor

Quite cool actually. Anyway now I have downloaded a simple flat steel image.

Simple I know, lets see how it looks with this texture over the entire ship.


That is a good basis to start from I think.

To add new textures to certain faces, firstly you need to assign a new material, and then you can add a new file image to it. In this instance I used the carbon fibre flat image that I found online. 

Using the new planar function as described earier, it fine tunes the direction and scale of the image and makes it look a lot nicer.

Here is the result after simply adding the carbon fibre texture to the face:

Add Carbon Fibre Texture


Here is the result after using the add planar function (reminder: select the face, then within the uv editor use shift and right click - add planar.)


So much better. Here is the result after adding the carbon effect to all wing panels:


Carbon Fibre Wings


It seemed a bit dull so I got a darker metal texture and decided to give all of the turrets and the front hatch a darker detail.

Same process again, add new material, add file etc..

Adding Detail

Select all objects at once to make for a speedier process. Here is the finished result:


After finishing the darker detailing I  realised  that the front hatch clashed a lot with the body, so I got a slightly darker texture to attach to the body.

The first attempt didn't really go to plan:

Maybe Not!


The second texture attempt was better, but still a maybe:

Maybe


A little too ' Russian Spetnaz' for my likings, although it did come in handy for a panel on the rear:

Back Panel
So I decided to add a glass texture to the front and back panels. The way in which I did it was to create a Blinn texture, usually used for a metallic surface, and then altering the properties to shadow the following;

Glass Specification


Back Hatch Glass


I also added a glass top the front, I think that this will add extra detail to the final animation, in fact it is made so easy for you that I am going to go back to the x-wing and repeat the process.


Front Glass 

Also I will get round to adding some internal detail to the Interceptor...watch this space.


Final Textured Design